HELLO

November 4, 2010

DIY: Vintage Tin Candles

Image courtesy of Design Sponge
I found this eclectic DIY project at Design Sponge. It's a great way to re-use decorative tins in a useful way. Check out the how-to here.

October 21, 2010

Recipe: Pumpkin Cream Cheese Muffins

I'm so glad the weather is staring to feel more like the start of Fall. I see leaves on the ground and we've gotten a little rain so far. So, my mind immediately turns to the wonderful use of pumpkin. In everything really, chai latte's, pie, and in this case, muffins. Really this recipe is more like cupcakes because they're just so delicious you can't really categorize these as muffins. With they're delicious cream cheese filled center, it's like the frosting is on the inside.  I loved every part of this cupcake the batter was perfection, the cream cheese was just the right amount of sweet, and the topping had great texture. These lovelies filled the house with the most delicious aroma, I wish I could capture it and keep it year round. My family loved these. It makes me happy:)

Recipe from Annie's Eats.

Yield: 24 muffins
Ingredients:
For the filling:
8 oz. cream cheese, softened
1 cup confectioners’ sugar
For the muffins:
3 cups all-purpose flour
1 tsp. ground cinnamon
1 tsp. ground nutmeg
1 tsp. ground cloves
1 tbsp. plus 1 tsp. pumpkin pie spice
1 tsp. salt
1 tsp. baking soda
4 large eggs
2 cups sugar
2 cups pumpkin puree
1¼ cups vegetable oil
For the topping:
½ cup sugar
5 tbsp. flour
1½ tsp. ground cinnamon
4 tbsp. cold unsalted butter, cut into pieces


September 23, 2010

Forever Marie Antoinette

Image courtesy of 100 Layer Cake


Image via Wedding Chicks
Image via Cake Coquette


Just thought I'd add some ridiculously delicious Marie Antoinette pastry inspiration to this day. I will never get tired of these screen shots! I'd be pretty much the happiest girl ever if I could spend the rest of my life styling amazing dessert tables like these...

September 20, 2010

Lovely Links of the Week: Vintage Details

{via Style Me Pretty}

Love the details from this DIY wedding.

There should be more of these kind of shoes.

Hands down my favorite style of all time. 

Great idea for an anniversary party, love everything about this shoot.

September 11, 2010

Recipe: Double Chocolate Birthday Cake


I made a delicious double chocolate cake for my husband's birthday. I had read great reviews for this recipe and decided to find out if it was all it was talked up to be. And let me tell you, it was! Really chocolatey, dense, super moist...delicious. The blurry picture of the slice does it no justice at all. I topped the cake with fresh berries as well as white chocolate dipped strawberries. Get the cake recipe here. In case you get to the recipe and are wondering about using two 9 inch pans instead of 10 inch, it's ok to do so because I used 9 inch pans and the cake didn't over flow. I also made boston cream pie cupcakes from this recipe. The recipe for the cupcake filling made a lot more than I actually needed so I used the leftover to serve with the cake and everyone loved it. Hope you make this cake next time there's a birthday or just in the mood for a great chocolate cake.

September 7, 2010

Vintage 1950's Wedding


Photography by Alisha Hurt via Pearls Events
I don't usually post a ton about weddings but when I come across one that catches my eye because it has something truely special I just have to pass it along. Like this vintage wedding that has such an amazing wardrobe! This wedding gown is stunning! I love to come across wedding dresses that aren't strapless, there are so many other flattering designs. It's modeled after the classic black and white gown that Audrey Hepburn wore in Sabrina. Which totally hits home for me. I love the ivory taffeta, the lovely cap sleeves, the amazing train with ruffle trimming, and look at the brooch detail on the back! Dress by Forever Rebecca. Paired with elbow length gloves and a short blusher veil just ties in the theme and feel of this wedding. The bridesmaid dresses were handmade and are so authentic to the era.

September 2, 2010

Update + Something pretty

Hello...whoever follows this blog,
Been busy with my first wedding with Kate Miller Events. Today was the setup, pretty hot I must say but other than that everything is going smoothly. Tomorrow is the wedding and I can't wait to see it all lit up and pretty, my favorite part. Can't wait to post pictures of it, meanwhile enjoy this breathtaking KME wedding featured on Style Me Pretty!

I'm super excited for the projects that are in the works and look forward to posting those soon. All I can say is one is inspired by a movie and the other is going to be an amazing editorial..

Thought I'd post something pretty to look at...I wish I had more time to paint. 

Find more of Jennifer Busking's work here.

August 22, 2010

{Yummy Donuts}

Finally bought myself a donut pan to bake delicious donuts. I quite like it! So today after work I made my first batch and they totally satisfied my craving for home baked donuts. Super easy and quick to make. Recipe from Sur La Table {love that store}, I added a little pumpkin spice and vanilla to mine. Yum!

August 19, 2010

{The home of a prop stylist}


The lovely eclectic home of prop stylist Emily Henson. She used to be a Display Coordinator at Anthro, naturally. I just love the kitchen and the mix of colors and patterns.

August 16, 2010

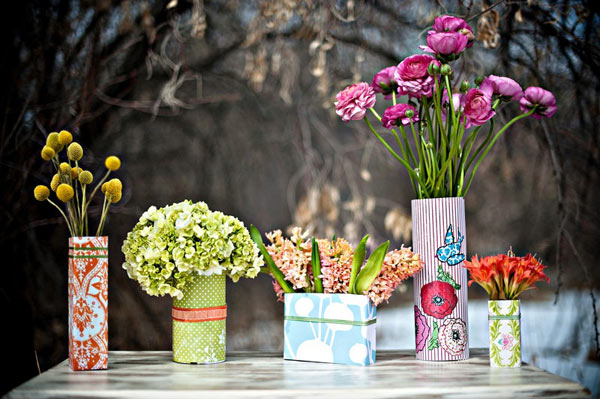
{DIY: Tin Can Vase}

This DIY project is simple, sweet, and great to do when you have a day off and want to take it easy. Fun to do with friends or kids. These vases would look great clustered together at a bridal or baby shower!

What you’ll need:
- Ruler
- Pencil
- Scissors
- Scrapbook Paper or gift wrap with interesting designs
- Decorative ribbon
- Spray Adhesive
- Containers to cover like an empty can, old unused vases and soda cans
- Floral foam
- Flowers

Instructions:
Step 1: Choose the container you would like to cover and measure a strip of the scrapbook paper to fit around the container.
Step 2: Cut the scrapbook paper into a strip that fits around the container.
Step 3: Spray a thin layer of the spray adhesive onto your scrapbook paper strip on the side you want adhered to your container.
Step 4: Wait one minute for the spray adhesive to get really sticky.
Step 5: Then, carefully adhere the scrapbook paper strip to the container.
Step 6: To add more interest to your covered container, spray measured pieces of ribbon with the spray adhesive and adhere to the container.
Step 7: Then, fill your container about halfway full with water. Cut flower stems at an angle to ensure they get the most water pumping through their stems. For a more hand-picked feel, simply cut the stems and place in the container. For more of a controlled, full look, you can use floral foam. Simply cut the floral foam into a piece that fits snuggly into your container and insert stems into foam.

{idea and instructions via: Ruffled}
Related Posts Plugin for WordPress, Blogger...